



Gold mirror Plexiglas: preparing an elegant logo for a LUMÉRIA salon
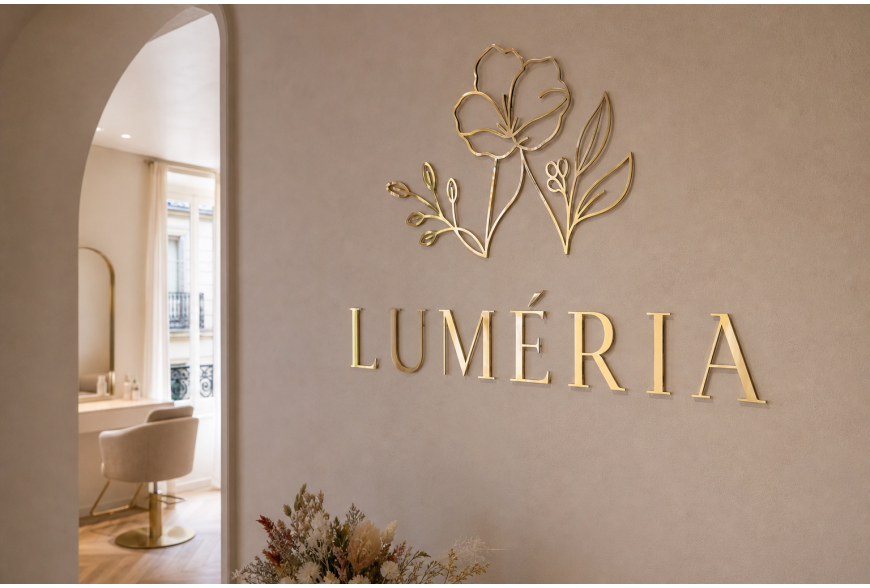
Installing a gold mirror Plexiglas logo in a small beauty salon requires careful preparation to achieve an elegant, durable result. This guide assumes the LUMÉRIA salon, with a fine floral emblem and individually cut letters mounted on a matte sand-coloured wall. It provides concrete advice on legibility, material and finish selection, file and wall preparation, and fixing methods suited to the described context.
Design and legibility: adapt the logo for mirror cutting
Before fabrication, adapt the logo to ensure legibility and durability. Convert all elements to vector paths/outlines and remove raster effects (shadows, gradients) that do not translate well to cutting. Simplify overly fine details of the floral emblem: extremely thin strokes can break or deform during cutting and transport. Provide internal bridges if the motif contains closed islands. For letters, favor sufficient stroke weight so contours remain crisp after cutting and polishing. Test legibility at distance and in situ: place a printed mock-up at final size on the wall to check contrast and spacing.
Material choice: gold mirror Plexiglas and edge finishing
Gold mirror Plexiglas is an acrylic with a reflective face; it offers a chic appearance but requires care. Confirm the mirror side and the presence of a protective film to be removed after installation. For edges, request polishing or a satin finish depending on the desired effect: polished edges give a more premium look and enhance reflections, while raw edges may appear less elegant. Avoid shapes that force the material to bend sharply, as reflective films can crack. Inform the manufacturer if the floral emblem contains fine parts so they can adapt thickness and cutting method (CNC or laser), noting that edge finish and reflections are important for the realistic appearance sought.
File preparation and BAT: clear expectations
Provide a clean vector file (for example PDF, SVG, AI) with all curves converted to outlines and fonts turned into paths. Separate layers for cuts, fixing holes and lettering so the workshop can prepare the cutting program without ambiguity. Add a scale, registration marks and a PDF preview showing the placement on the matte sand wall. Request a Bon À Tirer (BAT) detailing the installation sequence, the direction for removing the protective film and a visual of the expected finish. The usual lead time after BAT approval is 6 to 10 working days, to be confirmed on the final quote.
Wall preparation and installation template
Thoroughly clean the matte sand surface before installation: degrease and remove dust to ensure good adhesion. If the wall is porous or freshly painted, wait until the paint is dry and fully cured. Make a paper or kraft template to scale and position it on the wall to validate visual alignment and height. Use a laser level or spirit level to avoid misalignment. For a slight relief and shadow effect, provide an offset between the letter and the wall using shims or spacers; for flush mounting, favor careful bonding. Consider ambient lighting: orientation and mounting height influence how golden reflections are perceived.
Fixing: methods suited to individual letters and the floral emblem
Several methods are possible depending on weight, size and wall type: structural adhesive, mechanical fixings (standoffs, threaded rods) or a combination of both. For light letters on a flat, solid wall, a high-performance double-sided adhesive may suffice; for larger pieces or friable walls, prefer mechanical fixings. Mounting letters individually allows on-site spacing adjustments using the template. Use caps or plugs to conceal fixings when the mirror appearance must remain perfect. Avoid screwing directly through fragile areas of the floral emblem: seek reinforced fixing points or add support plates in PMMA behind thin segments.
Maintenance, NFC and electrical connections: practical precautions
For cleaning gold mirror Plexiglas, avoid ammonia-based products and abrasive cloths. Use a soft microfiber cloth and a plastic-specific cleaner or mild soapy water. If you plan to integrate an NFC tag behind a letter to share information (hours, social links), test it systematically: metallic and reflective surfaces can reduce range and reading reliability. Place the tag on a non-metallic area and test with different phones. For any electrical connection (indirect lighting of letters), have a qualified professional perform the work; do not carry out electrical work yourself and do not apply electrical procedures without a professional.
A well-made gold mirror Plexiglas logo strengthens the visual identity of an elegant salon like LUMÉRIA, but it requires rigorous preparation: vector files ready for cutting, appropriate material and finishes, wall preparation, an installation template and suitable fixings. Prioritize clear communication with the workshop to obtain a precise BAT and respect the usual lead time (6 to 10 working days after BAT approval, to be confirmed on the quote). For lighting or any electrical integration, hire a qualified professional. For integrating technologies such as NFC, test in real conditions to verify compatibility with the gold mirror and reading by different devices.