



From the logo file to the BAT: properly preparing a custom sign
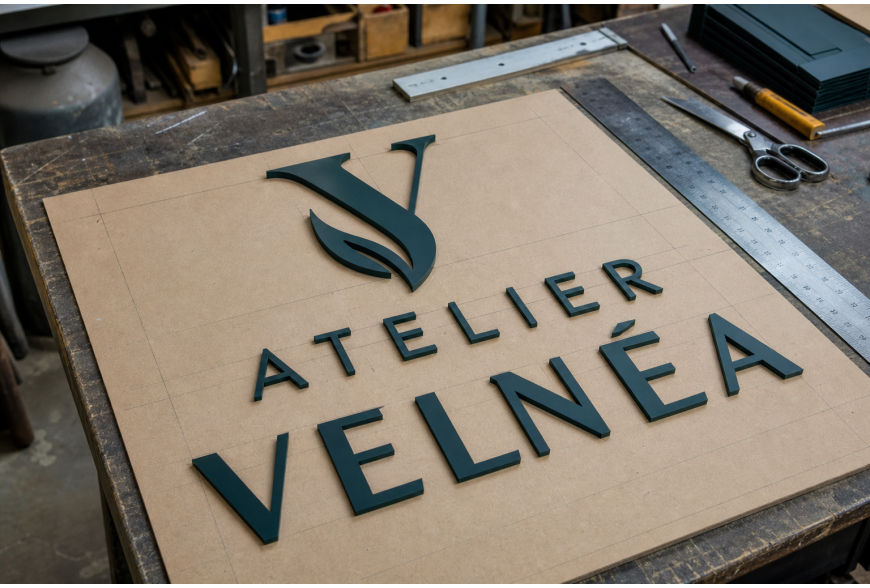
Ordering a custom sign involves several steps that are often overlooked: from the vector file to the Bon à Tirer (BAT), through the choice of materials and site preparation. This article gives concrete, operational advice so that your project — for example for an enseigne ATELIER VELNÉA — arrives at the workshop in the best possible condition and reduces back‑and‑forth. The goal: facilitate manufacturing and installation, improve legibility and limit surprises in production.
1. Define the objective and visibility
First clarify the sign’s purpose: main façade sign, raised letters, monogram logo, illuminated sign, totem or plaque. Measure the location and note the eye‑level height and the most frequent viewing distance (pedestrians, motorists). This information determines character size, letter thickness and the contrast required. Also consider the lighting context: a sign installed on a dark wall calls for stronger colours or backlighting. On your plan, indicate constraints (lintel, cornice, existing anchor points) and attach clear photos of the wall and surroundings. A cardboard template or an annotated photograph helps the workshop visualise the final result.
2. Optimise the logo file for production
Provide the logo as a vector file (AI, EPS, PDF vectoriel, or SVG) rather than a raster image when possible. Vector paths allow precise cutting and machining (CNC, laser cutting or waterjet). Check for layers, texts converted to outlines and a consistent colour mode (CMJN for printing, RVB for screen display if necessary). If your logo includes gradients or complex textures, provide a simplified alternative for cutting. For open letters or delicate intersections, ask the manufacturer for assembly elements (bridges, supports) in the file or a technical validation. Supply a Pantone colour swatch or equivalent to minimise colour discrepancies between your identity and the final material.
3. Choose materials and finishes
Material choice depends on aesthetics, durability and technical budget: cut PVC, laquered aluminium, dibond, brushed stainless steel, PMMA (plexi) or wood. PVC and dibond are lightweight and easy to machine, aluminium is robust and suited to laquered finishes, inox provides a premium look but requires specific installation skills. For an enseigne ATELIER VELNÉA with cut letters and a V monogram, mass‑coloured PVC or laquered PMMA can very well reproduce a deep colour such as the dark teal in the artwork. Regarding finishes: polished edges, powder coating, lacquering, full‑cover vinyl or UV printing yield very different results. If you plan to integrate lighting, choose compatible materials (diffusing plexi for illuminated faces, aluminium for housings).
4. Prepare the BAT and organise in the workshop
The BAT (Bon à Tirer) is the approval stage before manufacturing. It should include: a scale visual with dimensions, the chosen materials and their colours, the fixing method and a drilling plan if needed. In the workshop, a cardboard template (positioning template) will often be produced as on the workbench: this template facilitates on‑site installation and prevents misplaced drillings. Review the BAT carefully: check spelling, sizes, colours and logo orientation. The usual manufacturing lead time after BAT approval is 6 to 10 working days depending on the project, to be confirmed on the quote. Anticipate exchanges: the more complete the BAT, the fewer modifications during production.
5. Fixing, installation and electrical connections
Plan the fixing method according to the substrate: anchors and screws for masonry, mechanical fixings for metal façades or frames. Raised letters can be fixed with spacers, hidden rails or through‑bolts with cover caps. Provide or request a drilling template for the installation team; an on‑site cardboard template reduces errors. If the sign includes lighting, use a qualified person for the electrical connection; do not attempt electrical work yourself without expertise. For complementary technologies (NFC, QR codes integrated or chips), be pragmatic: NFC offers immediate interaction with compatible smartphones but requires proximity and a protected location for the tag. Test the robustness and readability of tags before final integration and discuss maintenance with the workshop. There is no universal solution: the choice will depend on use and the target audience.
Properly preparing a sign project requires method: measure the location, provide clean vector files, choose appropriate materials and validate a detailed BAT. In the workshop, a cardboard template, precise tools and clear communication with the shop ensure a smoother installation. For any electrical connection, hire a qualified professional and negotiate a schedule with full knowledge (usual lead time 6 to 10 working days after BAT approval, to be confirmed on the quote). Being precise upstream makes fabrication easier and ensures a result faithful to your visual identity, as a hypothetical workshop such as ATELIER VELNÉA might deliver.